
Base Guide
Concrete Basketball Court Base Guide
The gold-standard foundation for a concrete basketball court or any modular sport tile court. Use these specs to design a slab that lasts decades and plays like a pro court.
Why Concrete Is the Top Base for a Sport Court
Concrete provides the flattest, longest-lasting, and most stable base for any modular sport tile court. It produces consistent ball bounce, predictable footing, and easily exceeds a 30-year service life when poured and cured correctly.
That is why a concrete sport court is our first recommendation for a concrete backyard basketball court, pickleball or multi-sport build. Concrete basketball court installation happens in two stages. First, a licensed local contractor pours and cures the slab to the specs on this page. Then the Game Tile Courts tile surface snaps together on top. We supply the tiles, court kits and accessories; we do not pour concrete. If you already have a sound slab, read our guide to basketball court tiles over concrete, and to compare this with asphalt and gravel, see every sport court base option side by side.
Recommended Slab Specifications
These are the specs we give contractors for a concrete outdoor basketball court or any tiled sport court. Hand the full list to whoever is pouring your basketball slab.
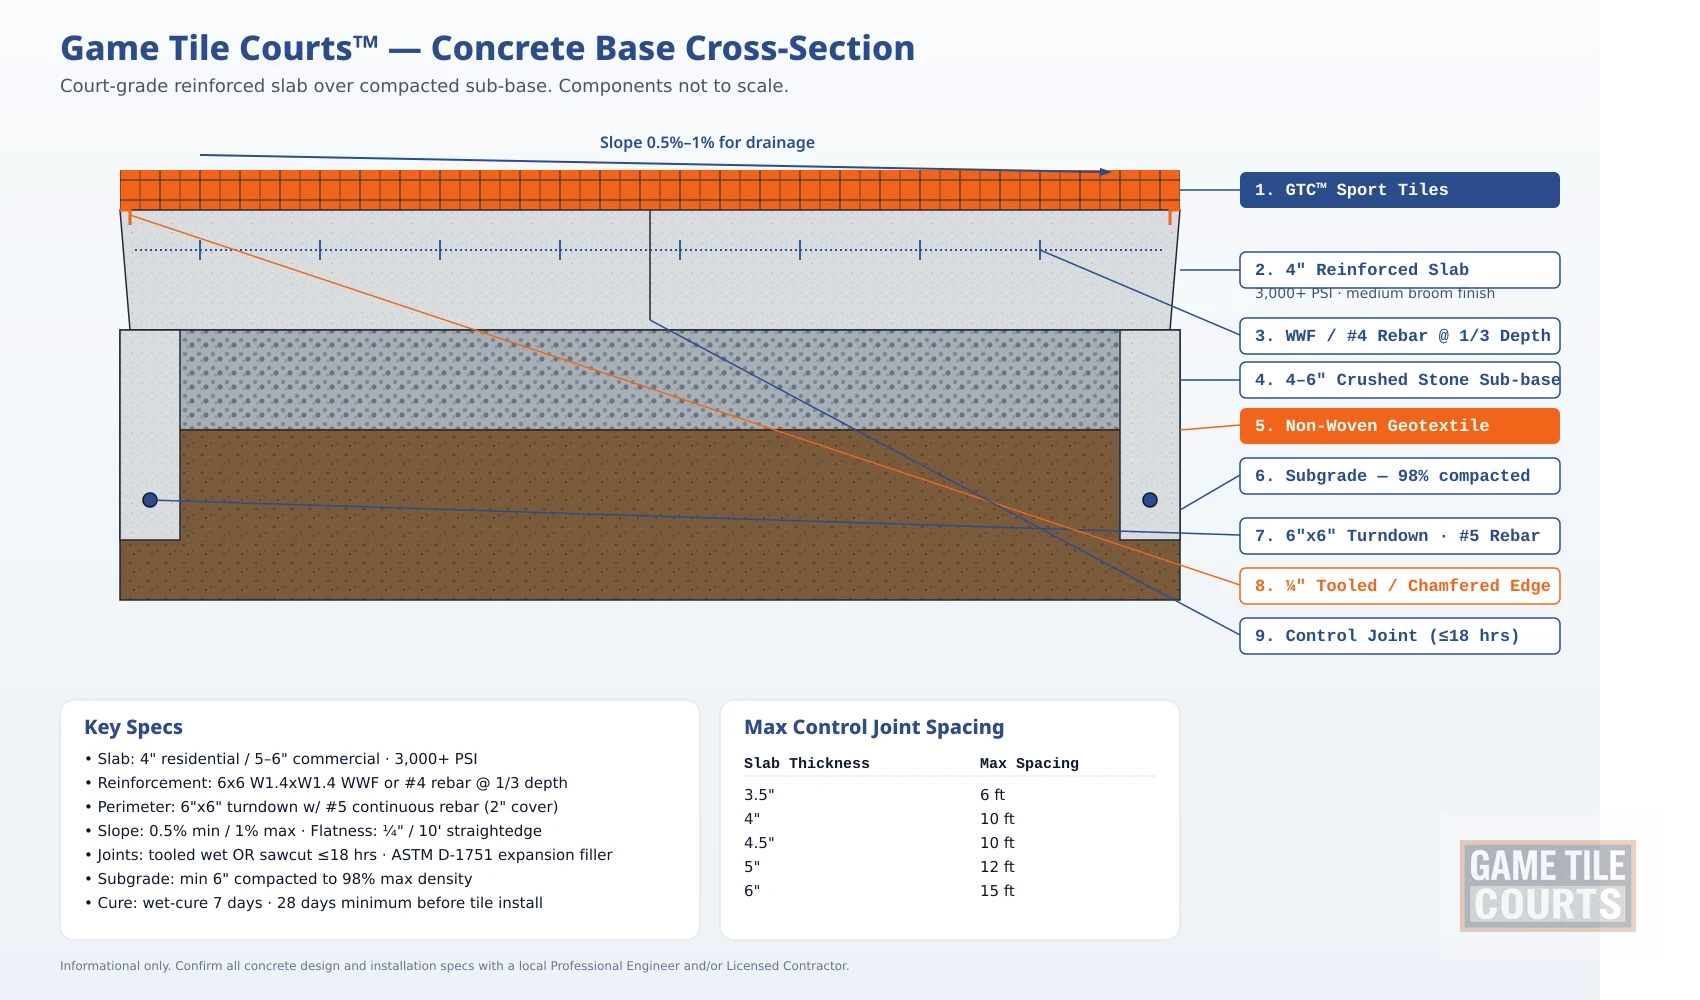
- Slab thickness: 4" minimum residential / 5-6" commercial or freeze-thaw climates
- Perimeter detail: 6"x6" turndown with #5 continuous rebar where slab abuts walls or other pavements (min. 2" concrete cover)
- Concrete strength: 3,000 PSI minimum at 28 days (3,500-4,000 PSI recommended; 5-7% air-entrained in freeze-thaw regions)
- Reinforcement: Fiber-mesh reinforced concrete OR 6x6 W1.4xW1.4 Welded Wire Fabric (WWF) placed at 1/3 the depth of the slab
- Sub-base: 4-6" of compacted crushed stone over non-woven geotextile fabric
- Subgrade: Minimum 6" compacted subgrade to 98% of maximum density
- Finish: Medium broom finish
- Edge: ¼" tooled radius edge or chamfered edge
- Slope: 0.5% minimum / 1.0% maximum in one direction for drainage
- Flatness tolerance: ¼" deviation over a 10' straightedge
- Control joints: Tooled in wet concrete OR sawcut within 18 hours - max spacing per slab thickness (see table below)
- Expansion joints: Required wherever new slab abuts existing concrete, curbs, walls, or other rigid pavements; pre-moulded filler meeting ASTM D-1751
- Joint sealant: All joints sealed with a sealant resistant to oil and fuel
- Vapor barrier: 6-mil polyethylene under slab in damp soil regions
- Cure time before tile install: 28 days minimum (wet-cure first 7 days)
Concrete Pad for a Basketball Hoop: Sleeve and Anchor Timing
If you want an in-ground hoop, plan the concrete pad for basketball hoop placement before anyone forms the slab. In-ground hoop poles are set during base work, so their locations have to be fixed before the base goes in. Hoop placement and backboard overhang are dimensioned on your Court CAD Layout and confirmed before installation, which gives your contractor an exact point to set the sleeve or anchor.
- Before the pour: set the hoop sleeve or anchor at the CAD location so it cures with the slab.
- Before the tile: the sleeve or anchor must be in and cured before tiles go down, so the tile surface can be cut neatly around it.
- Footing size: follow the hoop manufacturer's installation spec for footing depth and diameter.
Light poles and containment netting poles follow the same rule: they are engineered and sleeved into the sub-base before the surface is laid down.
Control Joint Spacing
| Slab Thickness | Max. Joint Spacing |
|---|---|
| 3.5" | 6 ft |
| 4" | 10 ft |
| 4.5" | 10 ft |
| 5" | 12 ft |
| 6" | 15 ft |
Step-by-Step Concrete Court Build
- Excavate 10-12" below finished grade to accommodate sub-base, slab, and perimeter turndown.
- Compact subgrade to 98% of maximum density (minimum 6" of compacted material).
- Lay non-woven geotextile fabric across the entire footprint to prevent soil migration into the sub-base.
- Place and compact 4-6" of crushed stone sub-base in 2" lifts.
- Form the perimeter with 2x6 (or deeper for turndown) and check for square via diagonal measurements.
- Set perimeter rebar - #5 continuous bar in the 6"x6" turndown with min. 2" concrete cover.
- Set primary reinforcement - fiber-mesh in the mix, OR 6x6 W1.4xW1.4 WWF on chairs at 1/3 slab depth.
- Pour concrete to spec thickness with 0.5-1.0% slope built into the screed.
- Float and medium-broom finish for a slightly textured surface and chamfer or tool a ¼" radius edge.
- Cut control joints - tooled in wet concrete OR sawcut within 18 hours, using the joint-spacing table above.
- Install expansion joints with ASTM D-1751 pre-moulded filler at all rigid abutments.
- Seal all joints with an oil/fuel-resistant sealant.
- Wet-cure for 7 days; allow 28 days total before tile install.
DIY Concrete Basketball Court: What to Hand to a Contractor
A DIY concrete basketball court usually means you install the tiles yourself and hire out the slab. The tile side is built for a confident DIY builder. The slab is structural work, so book a licensed local contractor and hand them:
- The Recommended Slab Specifications and the control joint table above.
- Your approved Court CAD Layout, with hoop, net post and light pole locations marked.
- Our printable court build documents for the base type you chose.
- A note that tile goes down only after the 28-day cure.
Thinking about skipping tiles and painting the slab instead? We do not paint courts, but our comparison of basketball court painting vs tiles walks through the differences.
Common Mistakes to Avoid
- Skipping the sub-base or undercompacting the subgrade - leads to settling and cracking.
- Pouring on saturated soil - causes long-term moisture issues.
- Trowel-finishing too smooth - slick surface affects tile lock-in and drainage.
- No slope or excessive slope - creates puddles or visible ball-roll bias.
- Missing the 18-hour sawcut window - uncontrolled cracking.
- Skipping expansion joints at abutments - slab cracks at the abutment line.
- Installing tiles before 28-day cure - traps moisture and can stain tiles.
Cost note: Concrete pricing varies with site prep, accessibility, reinforcement choice, and regional labor rates. Request quotes from local licensed contractors for an accurate estimate. For the tile surface, request a free quote and Court CAD Layout.
Disclaimer: These recommendations are for informational purposes only. Specific concrete design and installation requirements should be confirmed by a local Professional Engineer and/or Licensed Contractor.
Frequently Asked Questions
How thick should a concrete basketball court slab be?
A minimum of 4 inches of reinforced concrete is recommended for residential basketball, pickleball, and multi-sport courts. For commercial use or freeze-thaw climates, increase to 5-6 inches. Where the slab abuts walls or other pavements, use a 6"x6" turndown with a #5 continuous rebar.
When do hoop sleeves go in on a concrete basketball court?
In-ground hoop poles are set during base work, so the sleeve or anchor goes in before or with the pour, not after the tile is down. Hoop placement and backboard overhang are dimensioned on your Court CAD Layout and confirmed before installation, which gives your contractor the exact location to set. The footing size and depth come from the hoop manufacturer's installation spec.
What concrete PSI is required?
A minimum 3,000 PSI mix at 28 days is the baseline. We recommend 3,500-4,000 PSI with 5-7% air entrainment in freeze-thaw regions for added durability and reduced surface spalling.
What reinforcement should I use?
Two acceptable options: (1) Fiber-mesh reinforced concrete, or (2) 6x6 W1.4xW1.4 Welded Wire Fabric (WWF) placed at 1/3 the depth of the slab. Add #5 continuous rebar at the perimeter with a minimum 2" of concrete cover.
How flat does the slab need to be?
Target a tolerance of 1/4 inch deviation over a 10-foot straightedge. Game Tile Courts™ tiles will bridge minor imperfections, but a flat slab produces the most consistent ball bounce and footing.
How long does concrete need to cure before installing tiles?
Allow a minimum of 28 days of cure time before installing tiles. Wet-cure for the first 7 days for best long-term durability.
Do I need control joints?
Yes. Control joints can be tooled into wet concrete OR sawcut within 18 hours of placement. Max spacing follows slab thickness (4" → 10', 5" → 12', 6" → 15'). Expansion joints with ASTM D-1751 pre-moulded filler are required wherever the new slab abuts existing concrete, walls, or curbs, and all joints should be sealed with an oil/fuel-resistant sealant.